Setting up a Marker Float for Feature Finding
Setting up a marker float
A marker float set up is a rig that will help you discover the various contours and features lying beneath the surface of a swim. Setting up a marker float is easy. All you need is:
- Braid main line
- Nylon shock leader ( approx 2 foot in length )
- Marker float
- Pair or stumpy shape lead
- Stiff link – Amnesia
- Running ring
- Quick change link swivel
- Cork ball or foam
- Rubber bead
A braided main line is recommended for feature finding because it’s much easier to feel the vibrations due to braid’s limited stretch.
A nylon shock leader or any heavy mono line is used to stop the tangles around the marker float on the cast. A tangle often occurs if no leader is used, because braid is so supple it twists on itself and folds round the marker float. When this happens the float will not rise to the surface.
A pear shape of lead is best to use because there is more lead in contact with the bottom so all vibrations are amplified as they travel through the line.
A stiff link and cork ball is used to help keep the running ring off the bottom and away from potential snags, such as weed, which may stop the floats from rising to the surface.
A quick-change swivel is used so you can quickly change the weight or shape of the lead.
The rubber bead is used to stop the running ring from catching on the eye of the float which may stop it from rising.
How to Set up the Marker Float Rig
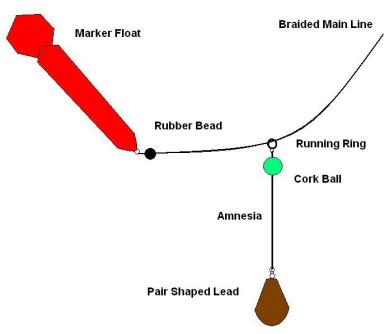
Start by cutting off 8-10 inches of Amnesia stiff link and attach it to the smaller eye of the running ring. Using a baiting needle, carefully push it through the cork ball (or foam) then slide it onto the Amnesia stiff link. Once the cork ball is on, push it up the link until it butts up to the running ring. Tie on the quick-change swivel to the other end of the Amnesia then attach a pear shaped lead to the swivel. This part of the rig should be about 8 inches long.
Now tie the shock leader to the braided main line using a double grinner knot. Slide the larger eye of the running ring onto the shock leader then slide on the rubber bead. Finally, tie on the marker float using a full blood knot.
Look at the diagram of a marker float set up below:
Now you have a marker float set up you need to know how to use a marker float for feature finding.
Other Carp Fishing Advice:
Techniques to Stop Ledgers Sinking into Silt Beds
How to Catch Fish at Linear Complex on Oxlease Lake
Using Method Feeder to Catch More Large Carp
What is Best Length for Hook Links on Carp Rigs?
How Often Should We Use Pop-Ups on Fishing Rigs?
Fishing Report for Linear Complex Brasenose One
Fishing for Large Carp Using High Visibility hook Bait
What Fishing Situation Best to Use Pop up Hook Baits?
Do We Always Need to Use Best Quality Carp Fishing Bait?
Carp Angling & Rig Presentation in Weedy Waters
Presenting a Fishing Rig on Silt Bed or Soft Bottom
What Rig Systems for Which Fishing Situation?
How much Gap from Hook Bait to the Hook Bend?
How to Catch Carp in Snags & Under Tree lined Areas
Using Single Bait Methods to Catch Out Large Carp
How to Tackle Crayfish Problem Fishing For Carp
What Area to Choose When Fishing a New Lake
How to Catch the Carp from Margins of Pools
Pre-Bait Fishing Tactics to Trick Huge Carp
Fishing for Carp in Mid-depth Water Using Zig Rigs
How to locate Shoals of Carp in the Springtime
How to Locate Big Fish in Local Lakes During Summer
What are the Best Baits for Catching Big Carp?
What is the Ideal Length for Hair Rigs Making Carp Rigs
How Does Raining Affect Carp Feeding Patterns?
Fishing Reports on Linears Lakes - Hardwick & Smiths
How to Stalk for Large Carp in the Margins
Can We catch Big Carp On Cheap Bait?
